Wood Carving Ideas for Beginners: Where to Start
How to explain what wood carving for beginners really is? The simplest way to describe it is as the process of shaping wood into artistic or functional forms using carving knives, chisels, gouges, or sometimes power tools.
Carving styles are versatile: whittling, which focuses on knife work, chip wood carving for geometric patterns, relief carving that brings flat surfaces to life with raised elements, and wood sculpture carving that builds full three‑dimensional figures.
In beginner wood carving, the focus is more on simple forms and small projects that build confidence step by step. Starting with easy wood carving ideas like animals, spoons, or ornaments will help avoid frustration and can make learning more enjoyable.
Quick Comparison: Best Beginner Wood Carving Projects
Here are some beginner wood carving projects you can try, arranged by complexity — from simple wood carving ideas to more advanced projects. Each project can be made more challenging if you wish. For example, by adding wood carving patterns or flowing lines, a basic heart shape can be transformed into an embroidered-looking piece of art.
|
Project |
Skill Level |
Time |
Essential Tools |
Best For |
|
Mushroom |
Beginner |
90 min - 2 hours (depends on the mushroom style) |
Sloyd knife, thumb guard, honing strobe |
These wood carving patterns are best for learning to carve in the round. |
|
Heart |
Beginner |
40min-1h30 |
Detail knife, pencil, sandpaper |
Simple wood carving ideas like this will help you master symmetrical cuts. |
|
Spoon |
Beginner- |
4-8 hours |
Hook knife, sloyd knife, hatchet, beeswax |
Understanding grain direction when working on functional wood carving projects. |
|
Comfort bird |
Beginner |
2–4 hours |
Sloyd knife, sandpaper, mineral oil |
A good starter exercise to learn carving smooth, flowing shapes. |
|
Simple animal |
Beginner |
2–4 hours |
Roughing knife, detail knife, small V-tool |
Developing anatomical shapes using basic carving patterns. |
|
Keychain |
Beginner |
40min-1h30 |
Small detail knife, drill, pliers |
It is ideal for those seeking to implement practical wood carving designs. |
|
Gnome |
Beginner |
3–6 hours |
Detail knife, 70-degree V-tool, small U-gouge |
Practicing caricature woodcarving and simple beard textures. |
|
Geometric |
Intermediate |
3–6 hours |
Chip carving knife, ruler |
The best things to carve out of wood for developing high precision and consistent depth in cuts. |
|
Relief leaf |
Intermediate |
4–8 hours |
#3, #5, and #7 sweeps, mallet, bench screws |
Learning depth and creating realistic organic shadows. |
|
Ornament |
Intermediate |
2–5 hours |
Detail knife, V-tool, eye pins, acrylic paints |
Creating lightweight, decorative items with varied surface textures. |
|
Wood spirit |
Intermediate, advanced |
6–12 hours |
#9 gouge, V-tool, detail knife, calipers |
Mastering human facial proportions and expressive, deep textures. |
|
Simple flower |
Intermediate, advanced |
4–8 hours |
#11 veiner, various sweeps, skew chisel |
It could be one of the complex small wood carving ideas to try if you go beyond basic surface shapes into deeper carving and fine details. |
Easy Wood Carving Ideas You Can Finish in 1–3 Hours
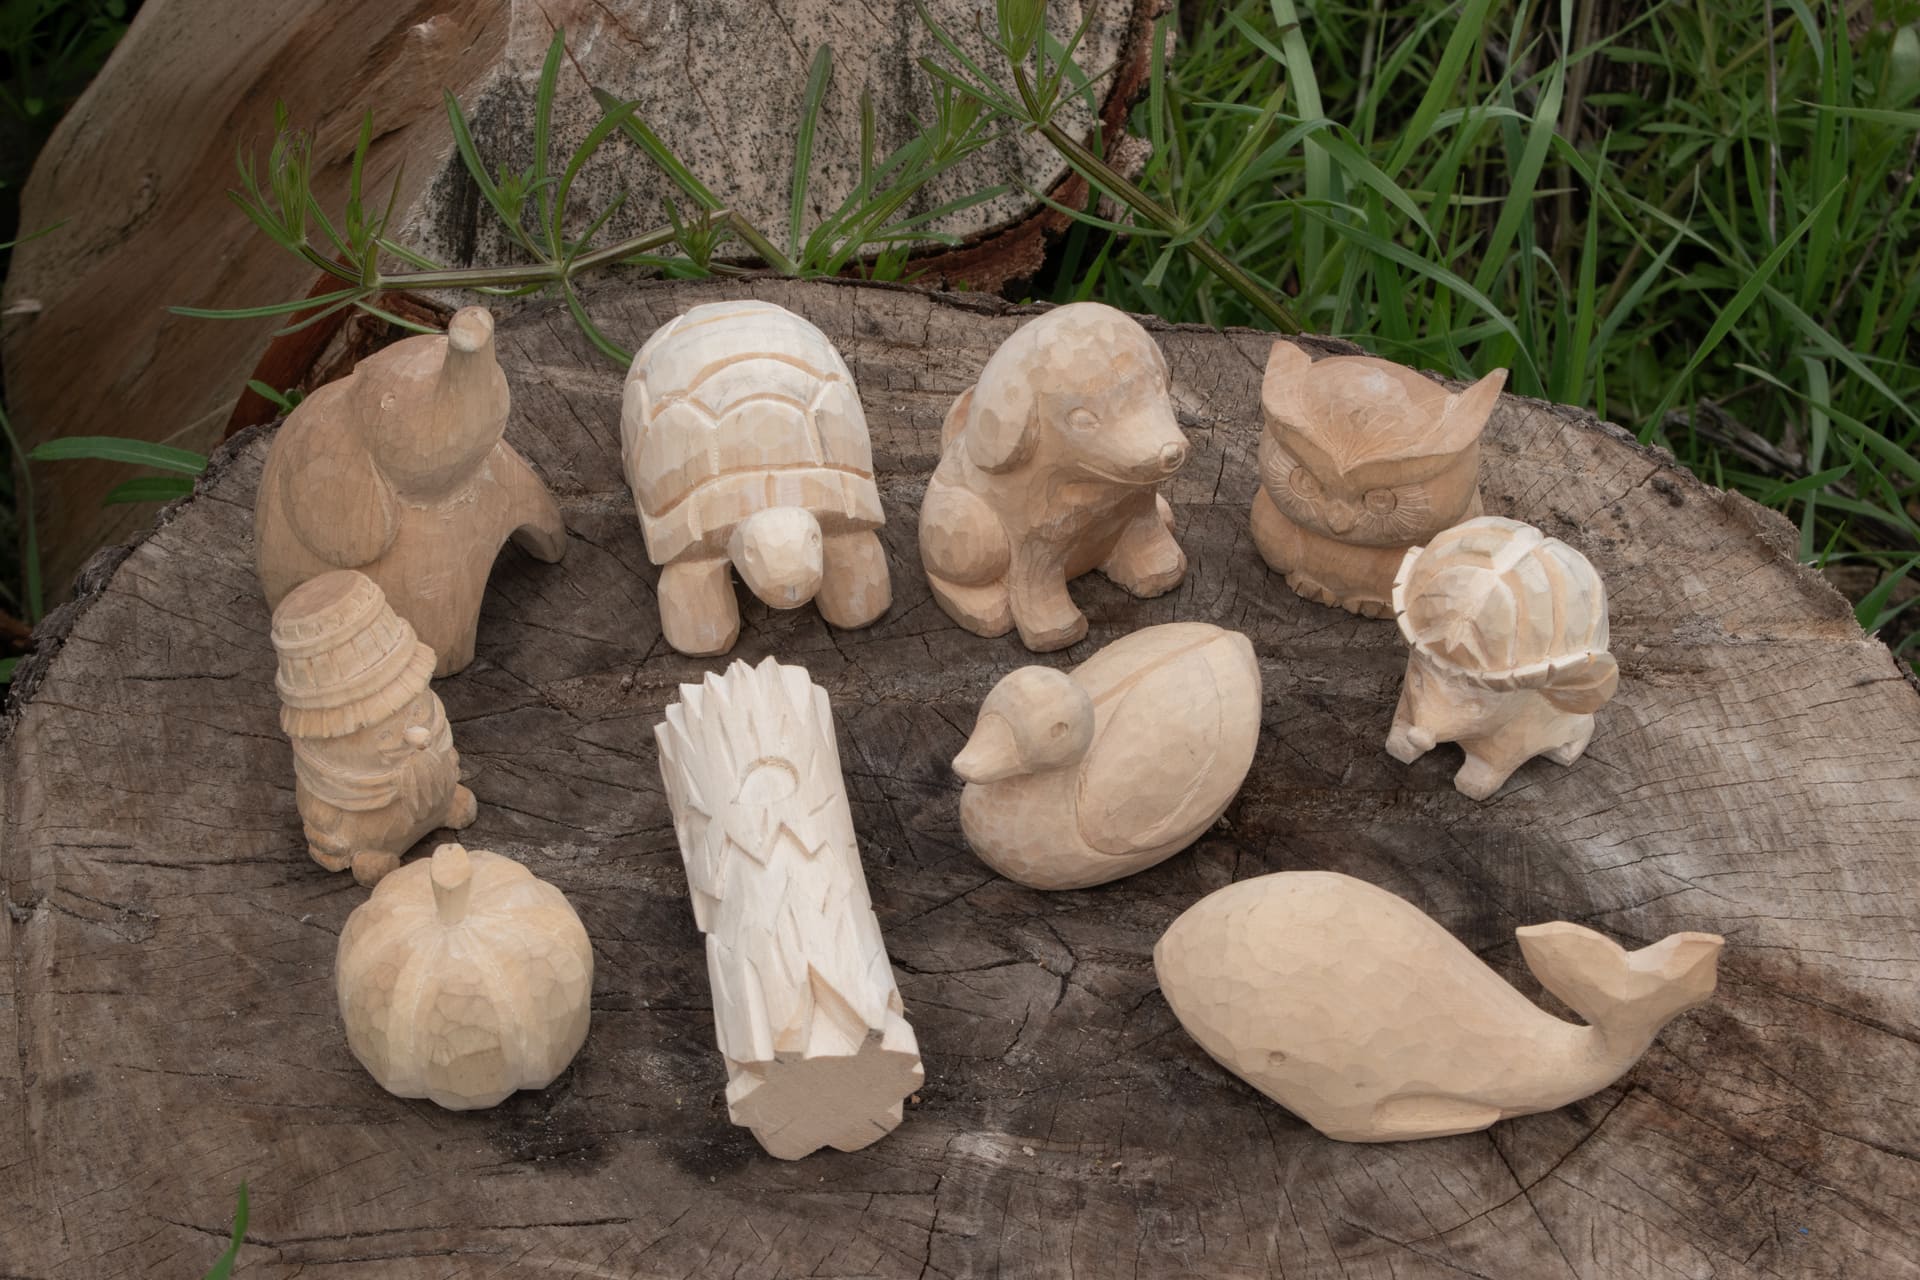
Every carving project is an opportunity not only to learn but also to create. These ideas show how even small blocks of wood can become keepsakes or everyday objects, while teaching the skills that make wooden carving so satisfying.
1. Wooden Soap Bar

Start with a simple block of wood and round off all the corners and edges. This is one of the best beginner small wood carving ideas because it teaches control and consistency before you move on to more complex shapes.
2. Worry Stone

Shape a flat piece of wood into a smooth oval with a thumb-sized dip. This is a classic example of cool things to carve out of wood, and a good project for practicing sanding and finishing so the piece feels comfortable in the hand.
3. Small Mushroom

Carving a mushroom is a fun way to learn how to carve wood in the round. You will practice transitioning between the cap and stem. By doing so you can better understand how to work with changing grain directions.
4. Wooden Heart

A heart is a great project for symmetry and concave cuts. It is also a chance to experiment with woodcarving patterns, adding flowing lines or decorative details to make the design more unique.
5. Letter or Initial Carving

Try carving a letter or initial into wood. This exercise will introduce you to relief carving, where you follow a set layout and focus on clean stop cuts and consistent depth.
6. Keychain or Pendant

These wood carving ideas let you experiment with geometric or abstract shapes, and you will also get practice drilling holes and attaching small functional parts to your carved piece so it can be used or worn.
7. Small Ornament

Ornaments such as stars or pinecones are fun things to carve when you want to play with textures. You can use wood carving templates or even download a free wood carving patterns pdf to spark inspiration and add decorative flair to your project.
Small Wood Carving Ideas for Beginners
Small wood carving ideas can be both fun and practical. You can decorate them with extra designs and eventually build a collection of unique pieces. They may also serve as a first step before moving on to more advanced wood carving patterns, such as carving chess figures.
8. Simple Bird (Comfort Bird)

This project is a staple in wood carving for beginners because it teaches how to shape ergonomic, flowing forms. The result is a piece of carved wood that feels smooth and balanced, making it a great exercise in control.
- Tools: A Sloyd knife for shaping and sandpaper from 80 to 400 grit for finishing.
- Techniques: Long, controlled paring cuts and thorough sanding to create a smooth surface.
9. Tiny Owl

The tiny owl is one of the most popular beginner wood carving projects. You will practice stylized anatomy in a compact form. It is also a good introduction to creating small wood carving figures, where proportion and detail matter a lot.
- Tools: A detail knife for facial features and a small V-tool or veiner for feather textures.
- Techniques: Use V-cuts for the beak and eyes, and repeat textural cuts to suggest plumage.
10. Small Fish

Among many wood carving projects, carving a fish is excellent for learning how to capture movement and thin profiles. It also gives you a chance to experiment with carving designs that emphasize flow and texture, especially in the fins and scales.
- Tools: A sloyd knife for the body and a small gouge or detail knife for gills and fins.
- Techniques: Practice carving tapered sections and add surface texturing.
11. Simple Gnome or Wood Spirit

These projects are a good way to explore caricature and facial proportions. They often draw inspiration from relief carving patterns, where deep stop cuts define features like the nose and brow. For guidance, many carving templates highlight how to block out facial forms before refining details.
- Tools: A detail knife and a 70-degree V-tool for beard and hair lines.
- Techniques: Carve deep recesses and use the V-tool to create flowing lines for facial hair.
12. Small Bear

The small bear is a classic example of working with simplified anatomy. It is a rewarding challenge for any wood carver because it requires balancing proportions while keeping the figure stable. As one of the more advanced carving projects, it teaches how to move from a square block to a rounded, three-dimensional form.
- Tools: A roughing knife for bulk removal and a detail knife for ears and paws.
- Techniques: Use planing cuts to suggest muscle groups and gradually shape the block into a rounded animal.
Useful Wood Carving Ideas
Carving projects do not have to be purely decorative, they can be functional too. If you want to make something useful for yourself or as a gift, you will find plenty of wood carving patterns online. With a bit of practice in wood crafting, you can create everyday items like a bowl, a wooden spoon, or even a simple knife.
13. Wooden Spoon

A spoon is one of the most practical beginner carving projects. It will help you manage grain direction better and balance strength in the handle. Such wood carvings can be both functional and durable when shaped correctly.
- Tools: Sloyd knife, hook knife (for the bowl), and a small hatchet for roughing out the initial shape.
- Techniques: Master the hollow cut with a hook knife and learn to navigate grain transitions between the bowl and handle.
14. Butter Knife / Spreader

Wood carving ideas for beginners like this one is a good chance to experiment with carving wood into flat, tapered forms that are sturdy yet functional.
- Tools: Sloyd knife and a sharpening stone to maintaina fine edge for the final tapering.
- Techniques: Practice long, flat paring cuts and apply food-safe finishes like beeswax or mineral oil.
15. Small Dish or Tray

A tray is one of those useful wood carving ideas as it teaches control over larger surfaces while keeping symmetry intact. It also gives you room to explore different carving patterns, especially when shaping the recess and smoothing the contours.
- Tools: Large gouges (such as a #5 or #7 sweep), a mallet for removing bulk material, and a rasp for smoothing exterior contours.
- Techniques: Hone your mallet-and-gouge control and practice leveling the bottom of a carved recess.
16. Bookmark or Letter Opener

These items are light and practical, so they work well as beginner wood carving ideas for practicing delicate tapering. They also encourage accuracy with small-scale carving ideas, where thin stock must be shaped carefully to avoid splintering.
- Tools: Detail knife for refining edges and high-grit sandpaper.
- Techniques: Master delicate shaving cuts and taper wood to a fine edge.
Relief Carving Ideas for Beginners
Relief wood carving designs are a great way to focus on technique without overcomplicating things. They give you room to practice shallow, medium, and deep cuts, and if you slip, it’s usually easy to blend into the background or adjust the design. That flexibility takes the pressure off.
What Is Relief Carving
Relief carving is about bringing life to flat wooden surfaces. Carvers use dimensions and shadows to make designs stand out. This technique will help you understand how to lower the background for depth and layer elements so the front details stand out, like in wood carving templates.
17. Simple Leaf Relief Pattern
It is one of those easy carving ideas that focuses on flowing, organic lines. Paying attention to the movement of the leaf ensures the surface feels natural, and it is also a good way to practice with wood carving patterns for beginners.
- Tools: #3 or #5 sweep gouges for the leaf body and a V-tool for the veins.
- Techniques: Bevel edges for smooth transitions into the background and follow curved grain carefully.
18. Flower Relief Panel

A flower panel is a solid choice for beginner carving projects. It is all about overlapping elements like petals and how wood relief carving can create layering details.
- Tools: Small U-gouges for petal curves and a veiner for delicate center details.
- Techniques: Use undercutting to create depth and transition smoothly between raised petals and the flat base.
19. Geometric Relief Pattern

Geometric work is a great way to explore carving art and learn precision and symmetry. It also connects well with small wood carvings, where even minor deviations in depth or angle can affect the entire repeating pattern.
- Tools: Straight chisel, a compass for layout, and a V-tool for clean borders.
- Techniques: Perfect stop cuts for crisp intersections and maintain consistent tool pressure.
20. Animal Silhouette Relief

You will often see this on the wood carving ideas list as it helps master carving patterns that mimic muscle flow and organic textures.
- Tools: Large gouges for background removal and small sweeps for anatomical contours.
- Techniques: Use contour carving to suggest body planes and add texture with furring cuts from a V-tool or veiner.
Easy Wood Carving Patterns and Templates
In wood carving for beginners, patterns are what keep things simple and steady. They guide your cuts, help you stay consistent, and cut down on frustration.
How to Choose a Beginner Pattern
When selecting your first project, prioritize wood carving ideas that use large shapes and minimal fine detail. Simple outlines let you focus on tool control instead of intricate textures.
- What to take into account: Look for patterns that emphasize in-the-round shapes like mushrooms or shallow relief motifs such as leaves. These shapes reduce challenges in wood carving for beginners and help you build confidence early on.
How to Transfer a Pattern to Wood
Patterns ensure consistency in wood carvings without losing detail during roughing out. Some transfer methods hold up better as you remove wood. Carbon paper is reliable, but attaching a paper template directly can also work well for easy wood carving projects.
- Cut: Trim the printed pattern closely around the silhouette of the design.
- Glue: Apply a thin layer of glue stick or light spray adhesive to the back of the paper. Avoid liquid glue.
- Align: Press the template onto the wood. Ensure thin parts (like beaks or stems) run parallel to the grain.
- Stop Cut: Carve directly through the paper lines into the wood to establish the design’s boundaries.
- Peel: Remove the paper as you rough out the waste wood.
- Clean: Wipe away any remaining glue before fine detailing to keep your tools and sandpaper clean.
Free Wood Carving Patterns PDF
Printable PDFs help practice in a more structured way. Many collections include relief carving patterns that teach depth and layering. They also provide simple wood carving designs that strengthen tool control and let you progress steadily.
What to take into account: Search for workbooks that include both the pattern and illustrated exercises.
Where to find simple wood carving patterns free to download:
- Carving Junkies
- Woodcarving Illustrated Forum
- Scribd
- Craftsmanspace
Beginner Step-by-Step Patterns
Step-by-step tutorials often feature easy things to carve out of wood, breaking projects into manageable stages. Some of them may introduce wood engraving ideas for beginners, showing how much can be achieved with simple tools before investing in a full set.
What to take into account: Choose tutorials that explain the why behind each stage. Knife-only patterns are particularly useful for those just starting out.
Where to find step-by-step patterns or video tutorials:
- Carving Junkies
- Doug Linker (YouTube)
- Whittling Woods (YouTube)
Step-by-Step: Your First Wood Carving Project
If you are not sure where to begin with wood carving art, a mushroom is a perfect starter project. Below are the essential steps to complete this easy wood carving exercise.
Tools You Need
A solid beginner kit for wood carving projects for beginners like mushroom should include:
- A roughout knife for removing bulk wood.
- A detail knife for shaping finer details.
- A small V‑tool or veiner for textures like mushroom gills.
Step 1 — Draw or Transfer Pattern
If you prefer beginner step by step wood carving patterns, start by transferring both the front and side profiles onto your blank using carbon paper or sketching directly. Always check the grain direction even in easy wood carving projects, since vertical grain along the stem adds strength.
Step 2 — Rough Out the Shape
Make large, controlled cuts to remove corners and excess bulk. Define the silhouette of the cap and stem before refining. Safety is key in every project, including easy wood carving ideas: keep your non‑carving hand behind the blade and use your thumb for controlled pushes.
Step 3 — Refine the Form
Switch to smaller, precise cuts to smooth transitions and sharpen the silhouette. Follow the grain carefully to avoid tear‑outs. The undercut between cap and stem is what makes these wood carving projects for beginners look polished.
Step 4 — Add Details
Use a V‑tool or veiner to carve textures such as gills or fine grooves. Deep, intentional cuts create shadows and depth that make details stand out. Work from the center outward.
Step 5 — Sand and Finish
Choose between a smooth sanded finish or leaving knife facets for a traditional look. If sanding, progress through grits up to 400.
Essential Wood Carving Tools for Beginners
Tools in wood carving are versatile, but the golden rule is to keep your kit proportionally concise to your project types and skill level. A few essentials will take you further than an oversized set. You may find plenty of tools at forgedsteeltools.com.
Whittling Knife

The whittling knife is used for general shaping, paring, and fine detail work. They include roughout knives for bulk removal and detail knives with smaller blades for intricate cuts. It is the go‑to tool for starting wood carving projects of all kinds.
Gouges

Gouges are essential for removing large amounts of wood quickly. They are categorized by sweep (the degree of curvature) and width, ranging from shallow #3 sweeps for gentle contouring to deep #9 sweeps for aggressive scooping. They are especially handy in beginner wood carving, where shaping curves is often the first challenge.
V-Tool

The V‑tool is used for creating crisp lines, defining boundaries between forms, and adding linear textures like hair. They exist in various angles, with 60‑degree and 90‑degree V‑tools. This tool opens up endless things to carve out of wood, from simple borders to detailed textures.
Hook Knife

A hook knife features a curved, spoon‑like blade designed for hollowing out concave surfaces. These are the primary tools used for spoon carving, available in single‑edge or double‑edge configurations. A good tool for experimenting with simple carving ideas that involve rounded or hollowed forms.
Sharpening Tools

Sharpening tools include bench stones (diamond or water stones) for restoring an edge and leather strops paired with honing compound for daily maintenance. Keeping blades sharp makes tackling easy wood carving projects much smoother.
Safety Gloves

Safety gloves are a critical protective measure to prevent accidental cuts to the non‑carving hand. Most are made from Level 5 cut‑resistant synthetic fibers, sometimes reinforced with stainless steel mesh for higher durability. They are a smart investment for anyone working on a simple wood sculpture or any other type of woodcarving.
FAQ
What is the easiest thing to carve out of wood?
Mushrooms, hearts, and comfort birds are simple starter wood carving ideas. These forgiving shapes let you practice curves and wood removal without strict detail.
What wood is best for beginners?
Basswood is soft, consistent, and easy to control, making it the top choice for wood carving ideas for beginners.
Do beginners need patterns?
Yes. Patterns simplify proportions and depth, letting you focus on tool control. Many start with beginner relief carving patterns to build confidence.
What tools do I need to start wood carving?
Begin with a sharp whittling knife, a leather strop, and a safety glove. This minimal kit is ideal for any wood carving beginner.
Is relief carving good for beginners?
Relief carving is excellent because it uses a flat surface, teaching depth control and layering without the complexity of full 3D work. Do not hesitate to try some flat wood carving ideas, they are a great way to advance your skills.
Where can I find free wood carving patterns?
Sites like Carving Junkies and forums like Reddit and Woodcarving Illustrated share plenty of easy wood carvings to practice.
Share:
Best Gifts for Woodworkers and Carpenters