When it takes more power and many swings to cut wood, your axe or hatchet blade is likely not sharp anymore. A dull cutting edge will not cut well; it will bounce, get stuck, or make messy cuts. This is also not safe. If you want to know how to sharpen an axe, a hatchet, or how to sharpen a maul, and find the best way to sharpen axe blades, keep on reading this blog to the end.
Tools You’ll Need to Sharpen Axes & Hatchets
Whenever you need to sharpen an axe or hatchet, you can send it to the manufacturer or professionals who offer sharpening services. This is a great option if you are short on time, want a clean factory edge, or the tool is badly damaged and needs fixing.
But sharpening an axe yourself can be surprisingly easy with the right tools. Popular manual options include using a mill file for rough shaping, followed by a diamond stone for finer shaping. You can then polish with high-grit stones (1000+) and finish using ceramic stones or a leather strop to remove burrs and refine the edge.
A good hatchet sharpener helps speed things up. Diamond stones cut faster and stay flat, they are ideal for outdoor use and ax sharpening for hard steel blades. In contrast, whetstones need soaking and flattening but are better for precise sharpening and offer more grit options. Many pros use both—diamond for shaping and whetstone for finishing.
Mill file vs diamond stone: what’s better for you
When you need to decide how to sharpen an axe, hatchet or maul, consider the steel first. Depending on the level of hardness and wear resistance, sharpening tools will vary:
- Type of steel you need to sharpen:
To sharpen hatchet blades made from lower-quality or softer steel, a mill file works quickly and efficiently. Mill files remove material fast and act as aggressive abrasives that reshape and restore dull edges.
For harder steels like high-carbon or alloy types, a file often doesn’t perform well. A hatchet sharpening tool such as a stone—especially a diamond stone—handles tough steel better. It creates finer, sharper edges suited for blades that require precision.
- Edge condition, outcome, and time commitment:
First, check the edge of your axe or hatchet—is it slightly dull or badly damaged? The more wear or damage, the more material you will need to remove using a mill file or coarse stones.
If you want a razor sharp axe, use fine stones or a strop, but expect to spend more time and effort. That level of sharpness suits carving or precision work. For most tasks, sharpening an axe with a mill file gives a strong, reliable edge that chops well.
- Self-assessment:
Only you know what edge and sharpness you need. For general use, most axes and mauls only require a file-sharpened edge. For tasks that demand more precision, like carving, a finer edge becomes more useful, but achieving it takes more time.

Here is a high-level overview of the mill file vs diamond stone most common use cases:
|
When to use |
Mill file |
Diamond stone |
|
Use case |
Rough sharpening, heavy reshaping |
Polishing, honing, regular touch-ups |
|
Best for |
Mauls, very dull blades, or damaged edges |
Hatchets, axes |
|
Finish |
Coarse |
Fine and sharp |
What grit really means (and what to start with)
The term “grit” refers to the abrasive particles on sharpening surfaces that remove metal from a blade and help form a clean, sharp edge. If you are new to axe sharpening, understanding grit levels is key.
- Coarse grit (100–400) quickly removes material and is ideal for chipped or very dull edges. It is also helpful for adjusting edge geometry and setting a new bevel.
- Medium grit (600–1000) refines the edge after coarse work. A 1000-grit stone is often the go-to for beginners—it gives a practical edge that handles outdoor work, wood chopping, and even sharpening a hatchet efficiently.
- Fine grit (1000–3000+) is used mainly for polishing and edge refinement. It removes metal slowly, but leaves behind a smooth, sharp finish that elevates performance for precision tasks.
To sharpen axe blades confidently, most beginners use a three-step grit system: starting with coarse, moving through medium, and finishing with fine stones.
Extra items that make sharpening easier outdoors
Besides the core tools you will need to sharpen the axe, there are a few compact extras that add comfort and control to the process. These accessories do not take up much space, yet they make a real difference when it comes to axe sharpening outdoors.
- Field vise: A compact field vise—like a stump vise or screw clamp—provides a secure grip on the axe head or handle. This stability helps maintain consistent pressure and angle, especially when using a mill file. This tool is especially helpful when you are learning how to sharpen axe.
- Cut-resistant gloves: Gloves protect your hands from metal filings and accidental slips, while a rag or brush helps clean off debris after each pass.
- Tool organizer: If you are wondering how to sharpen axe gear efficiently on the go, a compact tool organizer keeps everything in reach and prevents damage to your equipment.
How to Sharpen an Axe — Step by Step
Sharpening an axe the right way takes more than just tools—it takes consistency, technique, and attention to detail. Let us explore how to get it right.
Secure the axe: vise, clamp or stump
The best way to sharpen an axe is to secure it in a stable position while keeping the blade easily accessible. To do this, you can use a bench vise, clamps, or a stump vise. A bench vise offers precise control, clamps work well both indoors and outdoors, and stump vises are best suited for outdoor use.

- Using a Bench Vise
To use a bench vise, put the axe head flat, with the sharp edge just over the vise's grip. Clamp the handle or the back of the axe head tightly. To achieve an axe sharpening angle consistency, make sure the blade edge is flat and level with the ground.
- Using Clamps (like G-clamps)
Use two clamps to hold the axe head down, one near the back and one near the sharp part. Make sure the sharp edge hangs over the table so you can reach it easily. Check that the axe does not move.
- Using a Stump Vise
If you are looking for tips on how to sharpen an axe outdoors, consider using a stump vise. Push the stump vise into a solid log or tree stump with a hammer. Then, put the axe head into the vise and tighten it. This way is great for sharpening with a file or a round sharpening stone.
Match the factory angle — using the Sharpie trick
The Sharpie trick uses a regular permanent marker to make axe sharpening easier and more accurate. It is often included in any good axe sharpening guide because of how simple and effective it is. Even if you have the best axe sharpener at hand, this simple visual method will help you sharpen more precisely. Here is how it works:
- Find uneven spots: Draw a thin line with a marker along the angled edge of the blade. As you file, the marker comes off where the file touches. If any ink stays, that part of the edge is lower and needs more filing.
- Adjust your angle: Watch how the marker fades. Change how you hold the file so it touches the full edge evenly. This helps you stay on track while sharpening.
- Even out the surface: The marker shows where bumps or dips are. Keep filing until the marker is gone all across the edge.
- Match both sides: Once one side looks smooth, flip the axe and do the same. File until both sides look even and the cutting edge sits right in the middle.
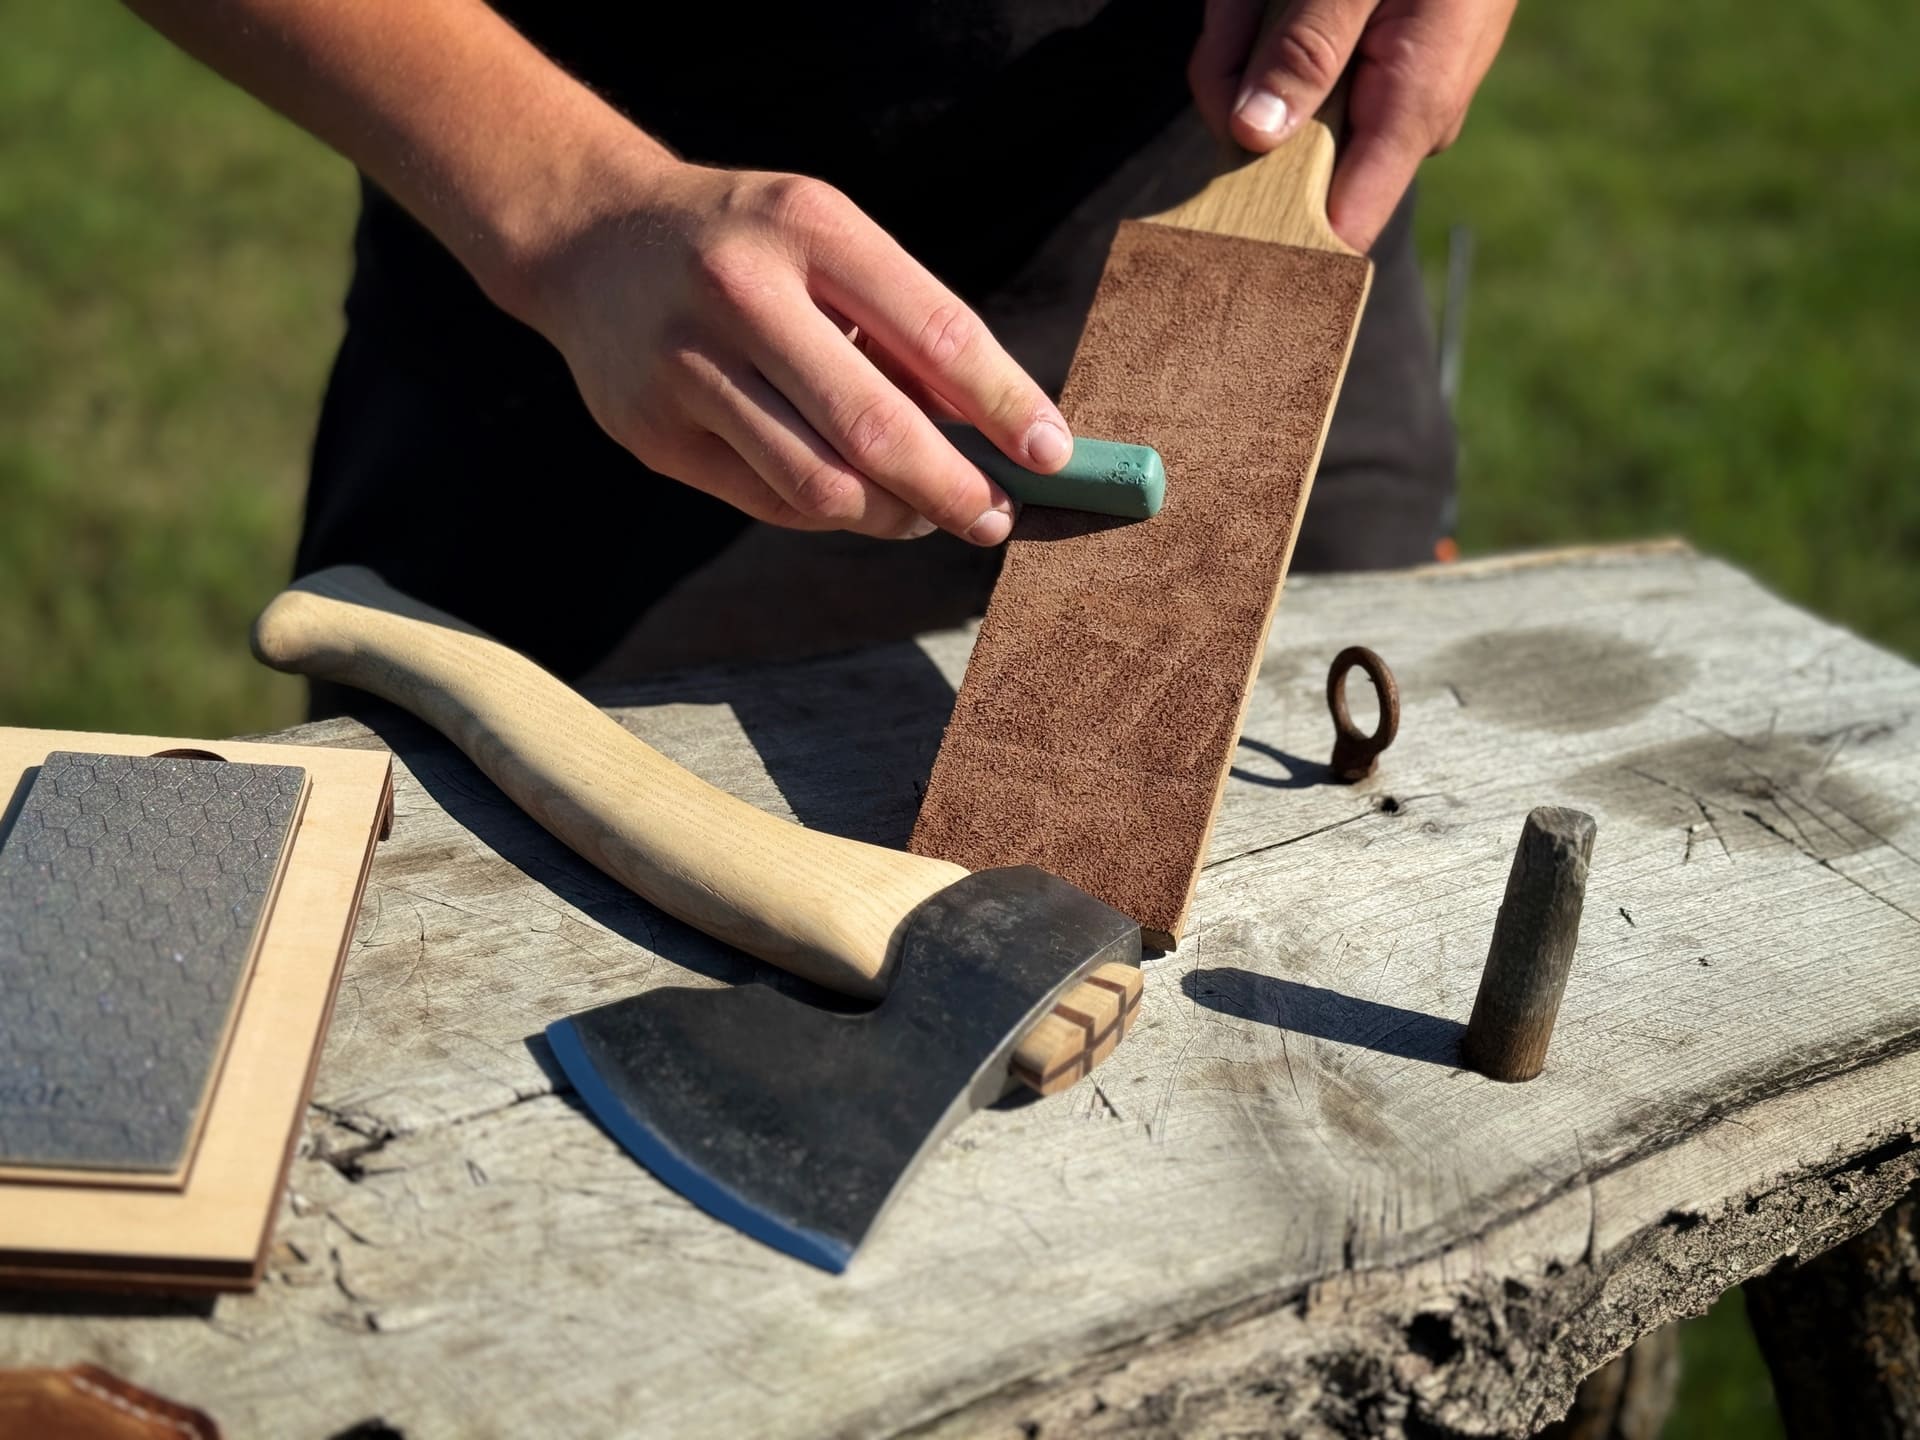
- Polish the edge: Once the bevel is shaped, polish the edge using a fine stone, leather strop, or puck to remove burrs and refine the blade. Even with the best axe sharpener, finishing with light strokes ensures a clean, durable edge that cuts smoothly.
How many strokes is enough? Signs you’re done
How many strokes you need for sharpening axe really depends on how dull the blade is, what kind of tools you have, and how you go about sharpening. If the edge needs a quick touch-up, around 10 to 15 strokes per side usually does the trick. But if the axe is in rough shape—chipped, flattened, or very dull—you will want to put in more effort, 40 strokes or more, starting out with a mill file to shape the edge.
What NOT to do when filing the edge
In our axe sharpening guide, we would also like to highlight the importance of reshaping the edge early on using a mill file, as well as the common mistakes to watch out for during this step:
- Wrong angle:
- To achieve a consistent axe sharpening angle, follow the original shape of the bevel (20°-35°).
- Use visual aids like a Sharpie line to guide your strokes.
- Keep your strokes straight and steady.
- Skipping burr removal:
- Burrs can weaken the edge if left behind.
- Use a leather strop, fine stone, or a scrap of wood to gently remove them.
- Using the wrong file:
- Start with a coarse mill file for major reshaping.
- Switch to a single-cut fine file for touch-ups and smoother finish.
- Forgetting to polish the edge:
- After filing, use a fine stone or strop to smooth the bevel.
- Polishing improves edge retention and cutting performance.

How to Sharpen a Hatchet — Precise Edge Guide
To sharpen a hatchet, the same sharpening principles apply because both an axe and a hatchet have beveled edges designed to cut or split wood. However, the edge matters more in hatchets and here is why.
Hatchet vs axe: why the edge matters more
When comparing a hatchet and an axe, the edge design plays a bigger role than many realize. Hatchets typically have a thinner, more curved edge for control and precision. Axes use a heavier, broader edge for splitting and deeper cuts.
That difference means your approach to sharpening a hatchet should focus on a fine edge, while an axe benefits from a more robust bevel. Knowing how to sharpen a hatchet or axe properly ensures better performance and safer handling in the field.
Working in sections for even sharpening
Like axe sharpening, the time required for hatchet sharpening depends on the desired outcome, the blade's condition, and the method you choose.
- Inspect the edge: Look closely for nicks or uneven spots. This helps determine whether you need to sharpen a hatchet lightly or fully reshape the blade.
- Secure the hatchet: Stabilize it on a firm surface to ensure controlled, safe filing. This is especially important for those learning how to sharpen a hatchet.
- Mark the bevel: Use a Sharpie trick to trace the cutting edge and keep your angle consistent throughout the process.
- File the edge: Using a mill file, push evenly along the marked bevel. The ink will fade where the file makes contact—adjust your stroke to maintain an even grind. To sharpen a hatchet consistently, you may use a rug. Folding it more than two times will help match steeper bevels or convex edges.
- Match both sides: Flip the hatchet and repeat. Consistent strokes help center the edge and prevent an uneven grind.
When and how to polish the blade edge
After filing and sharpening the bevel, polishing is the final step that transforms a rough edge into a clean, precise tool.
- Use a fine sharpening stone: Choose a grit between 600–1000 for smoothing the bevel.
- Apply light pressure: Stroke evenly along the edge, maintaining the same angle used during filing.
- Alternate sides: Switch between sides to keep the edge balanced and burr-free.
- Finish with a strop (optional): A leather strop adds a final polish. It is the best way to sharpen a hatchet to a laser-sharp edge.
Using a whetstone: soaking, sharpening, finishing
Whetstones are quite often used for sharpening a hatchet. They are gentle on steel, removing material gradually and offer multi-grit options–you can start with a coarse grit and move to finer grits for honing. The entire process boils down to these three steps:
- Soaking
- Put coarse and medium grit whetstones in water for 5–10 minutes until air bubbles stop.
- Fine grit stones may need just a quick dip.
- Sharpening
- Secure the hatchet on a stable surface.
- Maintain a 20–25° angle as you slide the blade across the stone, from heel to tip.
- Use a coarse grit (400–1000) to reshape and create a burr.
- Change sides.
- Finishing
- Switch to a fine grit (3000–8000) stone.
- Use light, even strokes to smooth the bevel and remove burrs.
- Check sharpness with a paper slice.
What About the Maul? How to Sharpen It Right
A splitting maul is built to smash through logs using weight and force—it doesn’t need a razor-sharp edge like an axe. Still, keeping the edge in decent shape matters for safety and performance.
Why sharpness is secondary but still important
The maul edge does not do much slicing, but it needs to be sharp enough to dig into the wood. If it is too blunt, the maul might glance off instead splitting cleanly. A slightly sharpened edge helps the maul start cuts safely and efficiently.
Quick-touch technique for working edges
To sharpen a maul to a good working edge, use a coarse mill file (mill bastard file) and make one smooth stroke across each side of the blade. This technique cleans up the edge and helps the maul bite into the wood better.
Maintenance Tips for Long-Lasting Sharpness
Sharpening axe blades is just one part of the ritual, as all that grit only lasts if the care goes beyond surface polish.

Oiling the head & handle: what works, what ruins
What works:
- Boiled linseed oil is the old-school armor—soaks deep, seals tight, keeps the handle tough.
- Apply a thin coat of mineral oil to the metal head to prevent rust.
- Always wipe off excess oil after application
What ruins:
- Olive oil turns sticky and sour.
- Excessive oiling can cause wood to swell and eventually split.
Seasonal storage tips (and humidity mistakes)
What works:
- Store tools in cool, well-ventilated areas using dehumidifiers if necessary.
- Apply a fresh coat of oil before long-term storage in cold weather.
What ruins:
- Storing tools near heat sources can damage wooden handles.
- Avoid using plastic wraps as they trap moisture, leading to rust.
When to re-handle or retire the tool
Re-handle if:
- The head is loose.
- Cracks in the handle are larger than a thumbnail.
- The handle has horizontal grain, indicating weak wood structure.
Retire if:
- There is deep rust that can compromise the metal’s strength.
- The tool's integrity is damaged.
Share:
How to Clean Wooden Spoons — Care Without Ruining Them
Free Wood Carving Patterns You’ll Actually Want to Use