Choosing the Right Wood for Spoon Carving
Making wooden spoons is a tactile and enjoyable pastime. If you are new to this hobby, our comprehensive guide will help you navigate all your initial questions, from choosing wood for carving to avoiding common mistakes and learning how to whittle a spoon. Let’s get started.
Best Types of Wood for Beginners
Woods for decorative spoons may not be the same as those chosen for food spoons. For example, maple and cherry are non-toxic, which makes them ideal for handcrafted kitchen utensils. Woods like oak and walnut contain tannins that can affect the taste of food, while others, like pine, are too soft and prone to absorbing bacteria.
If you are just starting to learn how to carve a spoon, choose wood that is easy to work with, such as softwoods and green woods. Freshly cut green wood contains moisture and is especially forgiving, helping reduce tool wear. Some of the best beginner choices for carving wooden utensils are:
- Cherry – A lightweight but durable hardwood that carves well when green and is gentle on tools.
- Beech – Strong, fine-grained, and affordable, making it one of the most common choices for carving a wooden spoon.
- Soft Maple – Easier to carve than hard maple while still being durable and completely food-safe.
- Birch – A great middle-ground wood that is easy to work with but still holds up well over time.
Hardwoods vs. Softwoods: Which to Choose?
The hardwoods we mentioned before like maple, cherry, and beech are durable, resist moisture, and provide a smooth finish. However, they can be more challenging to carve. Softwoods, on the other hand, are easier to carve and are better for learning wooden spoon whittling techniques.
Hardwoods
- Pros:
- Durability: Resist dents, scratches, and wear from regular use.
- Longevity: Hardwood spoons tend to last longer.
- Food-Safe Options: Many hardwoods are naturally food-safe (maple, cherry, beech).
- Cons:
- Difficulty Carving: Harder to carve, requiring more strength and sharper tools.
- Cost: Hardwoods can be more expensive.

Softwoods
- Pros:
- Ease of Carving: Easier to carve and forgiving on tools.
- Cost: Generally less expensive than hardwoods.
- Good for Practice: Perfect for learning how to make a wooden spoon.
- Cons:
- Durability: More prone to dents, scratches, and wear.
- Longevity: Softwood spoons do not last as long as hardwood spoons.
- Food Safety: Not all softwoods are food-safe. Resinous softwoods should generally be avoided (e.g., pine, cedar, fir, spruce, larch).
How to Prepare the Wood Before Carving
Before carving a wooden spoon, consider a few key factors:
- Straight Grain: Mastering how to make a wooden spoon takes time, so starting with a straight, consistent wood pattern will make the carving process easier and reduce the risk of splitting.
- Roughing Out: If the wood piece is too large, rough it out with a saw or axe to remove excess wood and make carving more manageable.
- Moisture Content: Ideally, the wood should be neither too wet nor too dry. Air-dried wood is usually in a good range. If using green wood, let the spoon dry slowly after carving. If the wood feels excessively dry, very lightly misting it with water might help, but proceed with caution as too much moisture can lead to cracking.
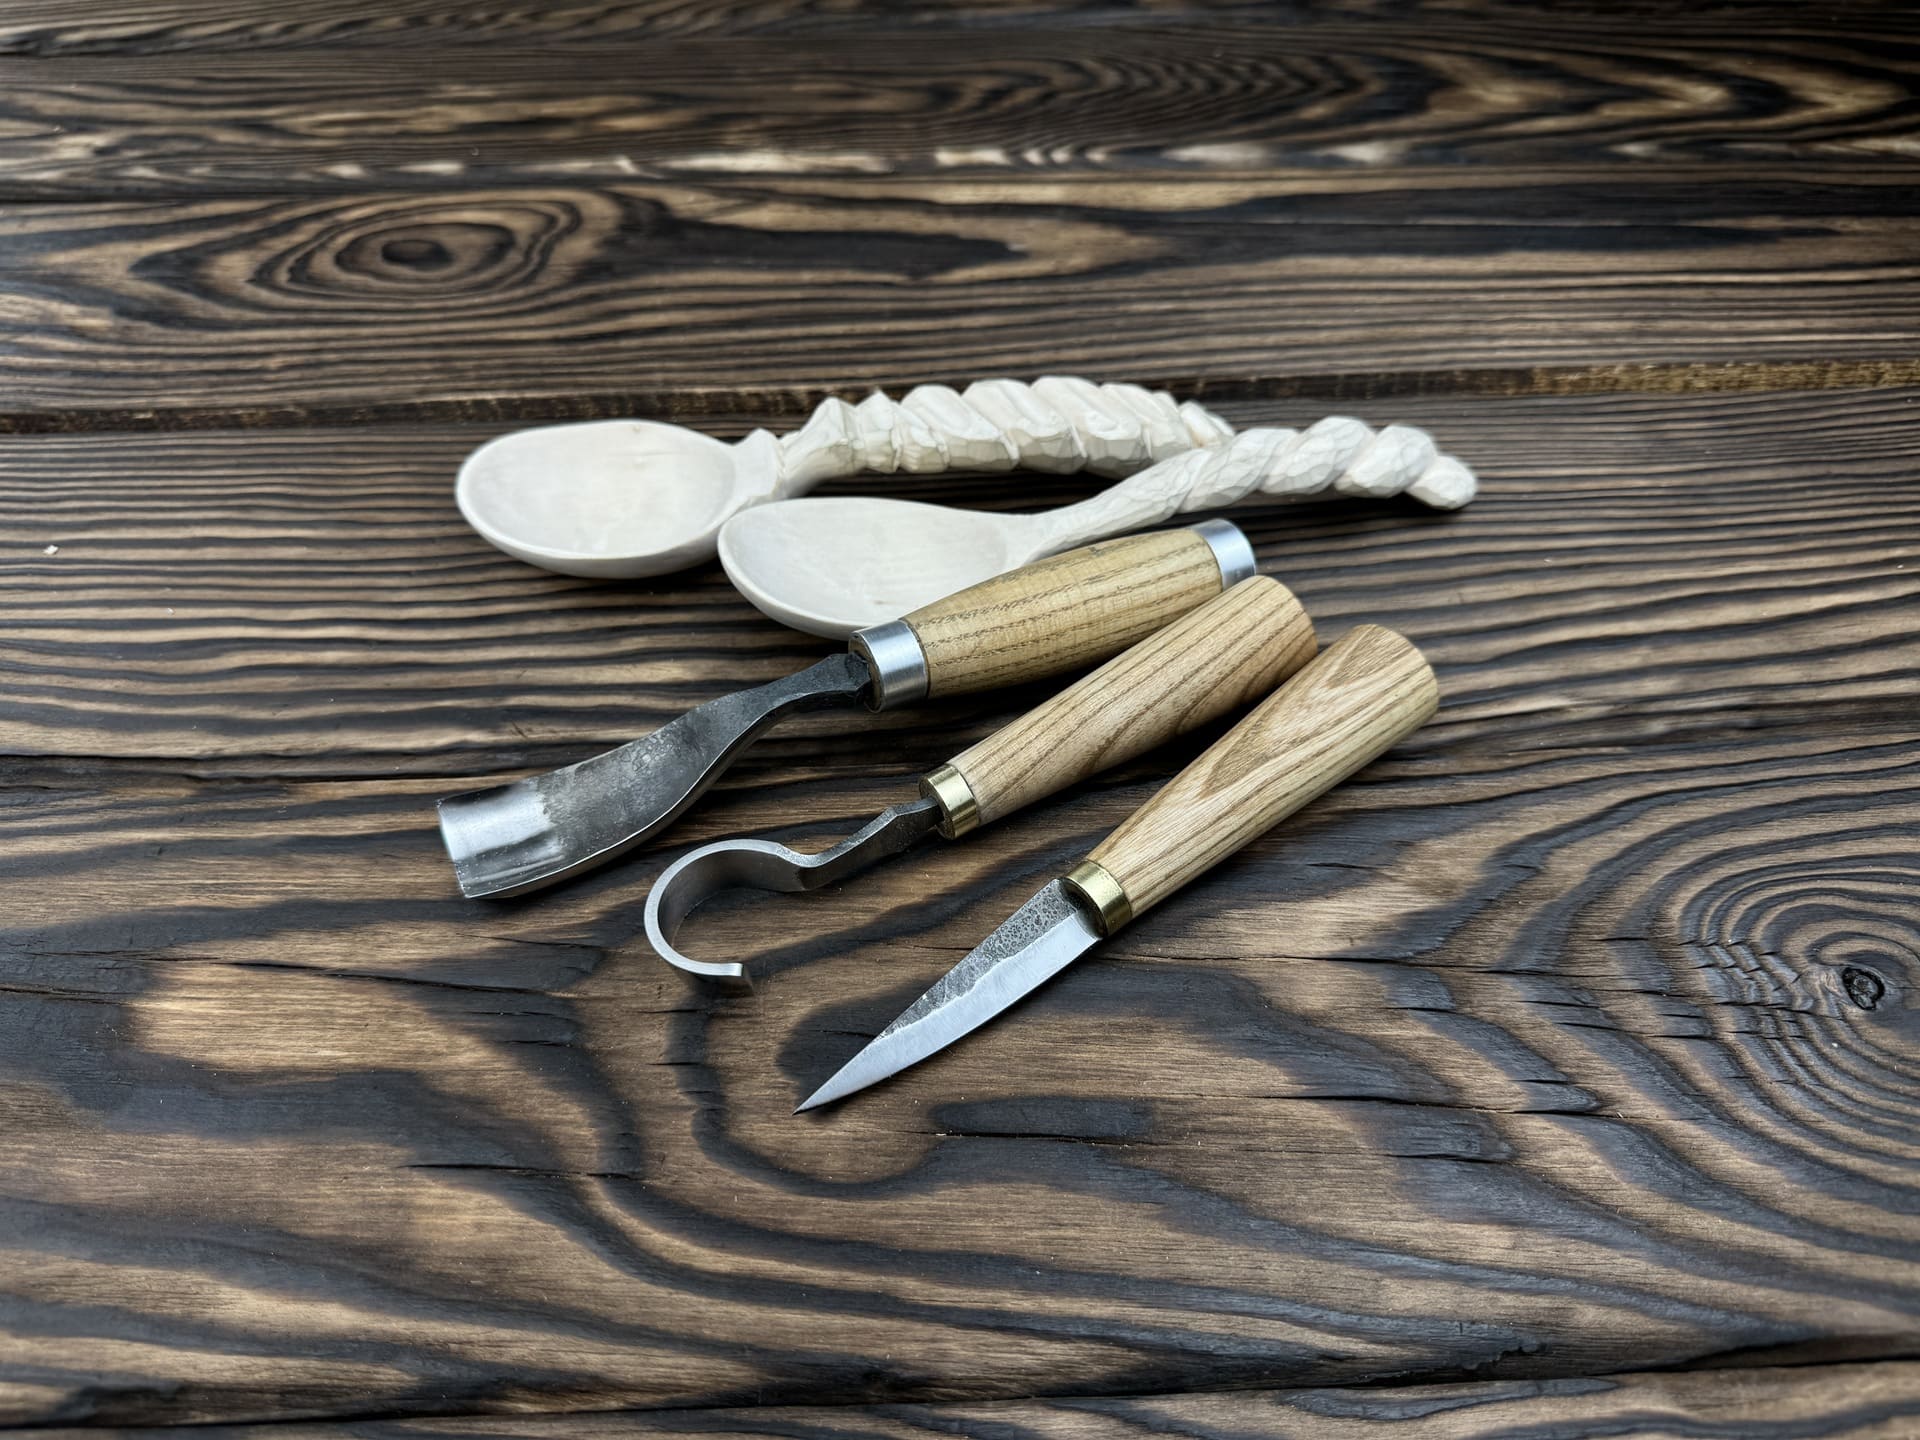
Essential Tools for Whittling a Wooden Spoon
Making wooden spoons is possible with a single carving knife. However, having tools like a hook knife and gouge can streamline the process and refine the final appearance. Let's explore the spoon carving kit essentials you may need.
The Importance of a Good Carving Knife
A good carving knife makes carving a spoon much more enjoyable and efficient. A high-quality tool allows for fine details and smooth finish. However, with so many options available, choosing the right one can be overwhelming. Here are a few selection criteria to help you out:
- Blade Material and Curve: Opt for carbon steel, which retains a sharp edge for a long time. Look for a blade with a gentle curve to make controlled cuts and achieve smoothness when carving a spoon bowl.
- Bevel Type: A single bevel is best for beginners as it is more manageable and ensures precision.
- Blade and Handle Length: The ideal blade length for carving a spoon is approximately 2-3 inches, while a handle length of 6-7 inches provides a comfortable grip and better control during carving sessions.

Additional Tools: Hook Knives, Gouges, and Mallets
Several additional tools commonly used for making wooden spoons include:
- Gouges: These are the best tools for woodworking, especially when it comes to removing larger amounts of wood quickly. They help create the initial outline of spoon bowls.
- Hook Knives: Used to refine the shape of the spoon bowl. Hook knives work well on softwoods and green wood, but hardwoods may require specialized hook knives.
- Mallets: Used with a splitting tool like a froe to split wood for blanks.
- Marking Tools (e.g., Veritas Pencil): Specifically designed for marking on green wood, as regular pencils do not work well on wet wood.
Maintaining and Sharpening Your Tools
Traditional woodworking skills include proper tool maintenance. A sharp tool is a safe and efficient tool that turns making wooden spoons into a rewarding experience.
- Regular Sharpening: For your carving knife, gouge, and hook knife, regular stropping on a leather strop with honing compound will keep the edges aligned and sharp. If they become dull, use sharpening stones, starting with a coarser grit and moving to finer grits for a polished edge. Always maintain the original bevel angle and work carefully to avoid rounding over the cutting edge.
- Inspecting Handles: Inspect the handles regularly for any signs of cracking or loosening. A well-maintained handle ensures a secure grip.
- Cleaning and Oiling: After each use, wipe down carving tools to remove any shavings or moisture. Lightly oil the metal parts to prevent rust. Store your tools in a dry place to protect them from damage. For mallets and froes, occasionally treat the wooden handles with linseed oil to prevent cracking.
Step-by-Step Guide to Carving a Wooden Spoon
Before we walk you through all the carving steps, allow the wood piece to settle at room temperature to minimize cracking before marking and cutting.
Now, let’s get to the practical part of how to carve a spoon.
Step 1: Design and Outline Your Spoon
First, decide on the type of spoon you want to carve–its shape, size, and purpose. Sketch design on paper to visualize the final product.
Step 2: Rough Shaping the Spoon Blank
For beginners, using pre-cut blanks is recommended. As your skills develop, you can start roughing out spoon shapes from raw wood. If you have some carving experience, try using an axe to create a basic spoon form. Apply controlled cuts to remove excessive material. Then, draw the outline on the wood to carve wooden spoon accurately.

Step 3: Carving the Bowl of the Spoon
Use a gouge to make initial cuts along the outline. Apply controlled pressure to remove larger amounts of wood. Gradually deepen the bowl while maintaining smooth cuts. Refine the shape with a hook knife, using sweeping motions for a consistent finish. Then, use a carving knife for detailed work around the edges of the bowl, remove any uneven areas, and focus on even transitions between the bowl and handle.
Step 4: Shaping the Handle
Shape the handle alongside carving the spoon bowl, going back and forth between the two. Apply push and pull strokes, being mindful of grain direction.
Step 5: Smoothing and Finishing Touches
Once the general shape is complete and the spoon is dry, sand the spoon and apply a natural food-safe oil. Allow it to dry fully.
Finishing Your Wooden Spoon
There are many opinions on wood finishing techniques for wooden spoons. Some prefer a natural finish without oil, while others use beeswax, walnut oil, or other food-safe finishes. Below are some common finishing methods—you can decide which works best for you.
Sanding for a Smooth Finish
Use sandpaper with various grits, starting with 80 (for removing significant imperfections) and moving to 320 (for final smoothing to refine the surface and remove scratches left by the coarser grits). If you prefer a rustic look with tool marks, you can skip this step.
Treating the Spoon with Natural Oils
The best oil depends on personal preferences and needs. Walnut oil is a popular choice, as it creates a durable finish and is relatively inexpensive but may darken the wood over time. Similarly, linseed oil offers a long-lasting finish but also causes darkening.
Caring for Your Wooden Spoon Over Time
Wooden spoons require a little extra care to keep them in top condition:
- Cleaning: Always hand wash with warm water and mild soap. Rinse thoroughly and dry completely before storing.
- Oiling: If the wood feels dry, apply walnut oil, mineral oil, or a specialized wood conditioner. Avoid vegetable oils, as they can turn rancid. Rub the oil into the wood and leave it for a few hours, then remove excess oil.
- Storage: Store in a cool, dry place away from high temperatures and moisture.

Common Mistakes and How to Avoid Them
It is quite common for beginner carvers to use their knives for prying wood, which can easily break the brittle tip of a carbon steel blade. Carbon steel, while excellent for sharpness, is less flexible than the stainless steel used in many pocket knives.
Another common mistake is neglecting to strop carving tools regularly. Short training sessions focused on basic carving safety tips are highly recommended for beginners to ensure hand safety and develop good habits from the start.
Over-Carving the Handle
Over-carving handles often results from a lack of planning. Sketch your spoon design beforehand and frequently check the thickness and balance as you carve.
Uneven Bowl Depth
Uneven bowl depth occurs due to inconsistent carving techniques and rushing the process. Use steady motions, check the depth regularly, and carve slowly for even results.
Splitting the Wood During Carving
Cutting against the grain can cause the wood to split. When you learn how to carve a spoon, identify the grain direction and always cut with it.
Frequently Asked Questions About Spoon Carving
Most of your initial questions should be answered by now, but here are some common queries beginners often have:
How Long Does It Take to Carve a Spoon?
To carve wooden spoon can take anywhere from a few hours to several days, depending on the complexity of the design, the type of wood, and the carver’s skill level.
Can I Use Any Wood for Spoon Carving?
When you learn carving techniques for beginners, it is best to choose wood with a straight grain, medium hardness, and good workability. Softer hardwoods like cherry, walnut, and birch are great options.
What’s the Best Knife for Beginners?
Look for pre-sharpened knives with high-carbon steel blades, as they hold a sharp edge longer. A blade length of 2-3 inches with a straight or slightly curved shape is ideal. Choose a handle made of wood or durable synthetic material for a comfortable grip.
Share:
Wood Carving Patterns for Beginners – Easy Whittling Templates for Free
Wood Carving Techniques for Beginners